Thursday, December 26, 2013

The Ever Growing Frankenpattern

(fair warning - the following is about as first-world a problem as you can get.)

Normally, I'm the kind of person who way over thinks things.   I try to avoid impulse buys, and am generally pretty good and the whole wait-a-week-and-see-if-I-still-want-it-thing.   However, from time to time, all this goes out the window and I do something unfathomably stupid.   In this case - I bought floral lace when I'd gone to the store for plain chiffon.

FLORAL.  LACE.

So, yes, for most people, perhaps no so odd - but the thing is, I really hate floral lace.   All the more if it is arranged with the motifs in a sort of a grid...

could it be more regular?

 Even when carrying it to the cutting counter, I couldn't quite figure out why I'd gone with this fabric.  I know I liked parts of the motif... but still.    I really have no idea what was going on with this one.  It wasn't even on super-sale.  ::grumbles::

still floral - but less grid-like

Anyhow, the bodice of the pattern I'd chosen was all choppy and in bits, so I figured I could disguise things a bit there - and I was hoping the pleats in the skirt would do the same, but no such luck.   (To add insult to injury, I didn't even center things properly...   It was just bad.  And we're talking Becky-home-ecy levels of bad.)  I've made this sort of thing work once before, by using a backing of the same shade as my lace - turning the flowers into nearly invisible texture.  But once, again, continuing my campaign of insanity - I chose a white background.

the current plan

So, I ended up throwing a third pattern into the mix, Butterick 5350, of the 8 paneled skirt.   Between the skirt panels I'd already cut out and the fabric I had left over, I was able to get everything set.  It's actually coming together fairly nicely, and if nothing else, I've found this particular combination is fairly flattering and I'll probably do it again in a fabric I like more.

Has anyone else ever done anything like this?  Or I am alone in my maddness?

Thursday, December 19, 2013

winter sewing and a new year's dress

There is something about winter that means I take a lot less pictures.  (Hah... 'something'.  There is no light by the time I get home, its all cold and I want to be a hermit.  I am a happy hermit holed up high above the horizon, hoping for higher heat.)

blech

..and with that... the coat.   Excuse the terrible picture.  I blame winter.   Also a lack of professional photographic equipment.  I feel this could mitigate winter.  but I digress - I find I don't like any of the swatches, so I am forced (forced I say) to go to the fabric store this weekend and play with things.    It's going to be rough.   

Anyhow. Continuing my recent streak on sensible decisions, I've decided this time of travel and work deadlines is when I need to sew a new dress for new year's eve -- and not just any dress -- a fancy franken patterened dress with lace and beading. (I have three kinds of beads) (I make good decisions)  

Specifically these two dresses: Vogue 1174 for the body and 1304 for the straps.
The main dress
The straps


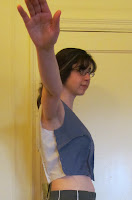
Not being completely insane, I'm skipping all the boning and foundation in 1174 and just doing the shell, relying on the straps to hold everything in place.   I needed to reshape the back a bit, as it lay oddly on my pointy pointy scapula and ditched the cap sleeve, as they almost invariably look terrible on me.


 The first fitting went pretty well - other than the straps, the biggest change is some reshaping around the cups to get everything to sit closer to my chest and prevent any gaping.  (The majority of the wrinkles are due to the fabric being smushed up in a ball for a couple of months before I used it for the muslin... Its not actually way too tight)

Next up:  make new pattern pieces, check them in  a second muslin, and move on to the actual dress!

Tuesday, December 10, 2013

Picking up the coat....

Remember how once upon a time, I was all gung-ho about making a winter coat?  I tested material samples, tried a couple of patterns, interlined, added zippered pockets and fancy sleeves?   And then remember how I got completely overwhelmed and decided I needed a quick break that turned into almost a year?

Well -- picked it back up a couple of weeks ago, and it turns out there isn't all that much left to be done.   I've basted in the lining and am now deciding how I'm going to actually finish this beast of a coat.   The original plan was to use self-fabric binding on all the edges and self fabric buttons as my closures -- however, as cute as that can be, I was starting to think it will be a bit dull.   Then, at dinner the other night, my friend showed up with a green wool coat with leather trim and the kind of covered zipper I'd been toying around with, and I was most intrigued.  (also, ignore the derp face.   I apparently couldn't look normal today.)

buckle
self fabric buttons
contrast

So...here are the options.   The original plan - the new one, with a contrast trim and hidden zipper, and a the final one with some kind of buckle thing instead of the zipper (which I'd been leaning towards all day, but am now thinking I like the hidden zipper)

I've ordered a variety of swatches for the contrast- and I'm going to see how well they work with the coat.

(Perfection fused leather in gunmetal grey, Sierra faux leather in grey, Bijoux faux leather in textured black, and Perfection fused leather in bronze, all from fabric.com) (no sponsorship, just a decent selection)

Anyhow, thoughts, suggestions or really whatever that is even tangentially related to how I ought to go about finishing this thing up while its still winter (tentative goal: wear it for New Year's Eve) would be most appreciated.   

Thursday, November 28, 2013

Making the Menurky

The glorious menurky
Happy Thanksgivingukkah!
okay, so technically not until sundown, but still.  just go with it.

Anyhow, for the only time in our lifetimes (and this won't happen again for something like 70,000 years) Thanksgiving and Hannukah are intersecting.  So, to commemorate the occasion, I have made a menurky.   

Wait, what?   A menurky!    A menorah (the thing we use to light candles for the holiday) and a turkey (the thing people of eat and always decorate with) hybrid of awesome.    Thus, menurky.  

first, formed from clay
Initially, I'd just planned to make a construction paper outfit for my regular menorah, but the only packs I found at the grocery store had about ten thousand more pieces of paper than I actually wanted.... but next to it, was a big vat of air dry clay.   Clearly the universe wanted me to form my own menurky (and in hindsight, not burn the house down.... paper and fire, maybe not such a good mix)

then painted with astonishing realism
After drying for three days, it was time for a paint job.  I used a combination of acrylics I had lying around, and a red permanent marker for the wattle.    Google provided an image of what turkeys actually look like.


the festive menurky, in the wild

And yes, I know, only one candle tonight, but I decided to take glamour shots this morning with all its candelly glory.  So check out the menurky, modeling and generally working it for the camera.


Tuesday, November 12, 2013

Lace Applique Seams - a quick how to


After rushing through the hem of my lace dress - I decided to re-do it properly - and not just properly, full on couture awesomeness.

The dress is already slightly shorter than I'd like, and the original hem much shorter, so I decided to do a band, but as I'm working with the scraps, no section of lace was long enough to cover the whole front without innumerable little patches and joins, which I didn't much like the look of.  So, instead, I decided to try an applique seam, as described in Claire Shaeffer's Couture Sewing Techniques.

lace and underlining + just underlining
I started by sewing together three layers - underlining, lace and underlining.


checking the motifs
Then I laid the new piece of lace on top and matched up the motifs.


cutting out the motifs
 The edge of the overlapping motif was cut out very carefully, about a half an inch from the seam.


stealth seam!
The edge of the lace motif was sewn down by hand - resulting it an invisible join.


Thursday, October 31, 2013

I won I won I won

victory is mine!   
For mine is the most glorious of costumes!  I am ... Corny!  (I know.  I crack me up too.)

For reasons even I don't understand, I decided that *this year* I was being an ear of corn -- it's been floating around in my head for a while now, and for one reason or another I never quite got around to it.
the original plan was a bit more subdued...

The original plan was a yellow kernel-studded hood, with a green robe, decorated to look like leaves, so my arms would look like a half-shucked ear.


When it came to actual construction, I just sort of started screwing around.   Odd decision number one:  It is construction entirely of tulle (35 yards, to be exact)  the original plan called for cheapo cotton and a sort of cartoony look.  However, I knew I was going to attend multiple events, and that it was going to be nearly impossible to clean.... so for whatever reason, I decided tulle is plastic-y, I could hose it off and be ready-set-go for the next party.

The costume is based on a poof, pinned to my hair, which eventually developed arm holes, a face hole, and layers of upon layers of leaves.   The first set of kernels continued the sort of cartoony aesthetic (see first image below) but those few kernels used up almost all of my 10 yards of yellow (10!!!!!!!)  so, they got pulled apart and turned into the series of loose loops I ended up using for the final version.


Another 25 yards of tulle later (for a sum total of 35 - I know - but you wouldn't believe how much fun it is to frolic about in) I had a corn costume so artsy, no one could guess what I was supposed to be.

C'est la vie d'artist.  

HOWEVER - once I'd explained what was going on, most people dissolved in laughter, which I count as a win (and I won the costume contest, which is a more objective style of win) (double win!)


CORNTASTIC AWESOMNESS WISHES YOU A HAPPY HALLOWEEN!
(the best holiday ever.  period. exclamation point.)

Sunday, October 20, 2013

a bit of knitting

For a while now I'd been playing with the idea of getting back into knitting - looking at patterns, getting book with interesting techniques, stalking people on ravelry, etc..     A couple of weeks ago I ended up in a part of the city I don't usually frequent and happened to walk by a yarn store.... so in I went to start petting the merchandise.  I can't wear wool next to my skin (even cashmere or merino - trust me.  I stuck my arm into the boxes of yarn to test it out) so the original plan was cotton with some spandex and the owl sweater.


 However, I didn't like the colors they carried, so I continued petting things until I came to a silk and cotton blend I fell in love with.(Seta Tweed, by Lang Yarns in a sort of turquoise color - its brighter and darker - I guess more intense - than shown above)  I was paranoid about the stretch and recovery, so I ended up going with a franken-pattern of a cardigan from Textured Stitches by Connie Chang Chinchio (plus the inevitable screwing around that happens with all my projects)   the next big challenge is getting the arm holes to come out right... wish me luck!

Sunday, October 13, 2013

sewing to the last minute - finished B5748


Can we stop for a moment and discuss how incredibly and unreasonably cold it gets in New England (both before and after this photo shoot I was covered head-to-toe and there was a hefty dash of polar fleece in the mix.)   Anyhow, I finished this sucker a good four hours before the wedding, so ..win!   (I actually really like this patten, especially with the pockets, and plan to make a couple more.. although probably in the spring.)

spin spin spin - and try not to fall down the hill....
I highly recommend it for its spinning-ness and general fluffy flouncing about.  In all of these pictures I'm wearing it with a full crinoline, but it also works with just the dress.  The pattern itself is was very easy to work with and the fit came together nicely.  The only major change I put in, was to add pockets.


The fabric is a cotton lace, backed with cotton broad cloth -- meaning the whole thing is machine washable, which may make it my new favorite formal dress.
Liza, the glorious photographer of awesomeness.  She is cold too.

wedding fun times.  (and conveniently wearing the same color as the bride's maids)

Sunday, October 6, 2013

RennFest Part Two - the return of the bodice!

and I'm back ... with renn fest costume fun times!

I've been sewing quite a bit, but just haven't been in a bloggy sort of a mood - however, a new renn fest costume (yes, its the second one this year) seemed to deserve a proper post.

It was started for the historical fortnightly 'wood, metal and bone' challenge - although having missed the deadline by about two weeks, I think I'm going to push it forward and have it be my 'something green'.   The bodice / pair-of-bodies / corset / stays is an update of the one I made a few months ago.  I think I'm slightly short waisted - so I took about an inch off the length of the bodice.  I also narrowed the whole thing and added tabs for shoulder straps.

update = purple, original = white


 I find the updated version to be much more comfortable.  It doesn't pinch at all, and having the boning (zip-ties) extend down into the tabs prevents pressure points.


 The outer fabric is a brocade drapery remnant of in determinant material and the lining in a thick cotton twill I used for a skirt many eons ago.   (The whole costume is actually a glorious stash bust!    The green dress is muslin I dyed forever ago and never got around to using and the black is an embroidered cotton that I loved in the store but was a little two sweet when I got it home.   For costuming it worked perfectly.   In fact, the only thing I had to buy was the bias tape for the binding and the lacing cord.)  the green under-dress is your basic huge shift with not enough shirring at the top and the back over-skirt is a large square with the circle cut out of the center.


The final fit of the bodice still isn't quite right (it needs to be tighter on top - I put the tabs too far to the sides and my arms prevent it from sitting correctly...  c'est la vie) However, all in all, I'm really happy with this costume and plan to use it for another yer or two.  (Ideally with more elastic in the sleeves...)  (They are actually even... it was really hot again and I kept tucking them up, out of the way)

The Challenge: #19 'wood,metal and bone' or #21 'green'   (you know... whichever makes you happy...)

Fabric:  mystery brocade and cotton twill
Pattern:  pair-of-bodies: Elizabethan Custom Corset Generator
Year:  circa 1550
Notions:   heavy-duty zip-ties, grommets, cording, bias tape
How historically accurate is it? the shapes and patterns behind both items are actually pretty accurate.  The fabric and construction methods were modern.
Hours to complete: About 6 - I was able to reuse the zip-ties from the last time, which saved a lot of effort.
First worn: October 6, 2013,  To the Maryland Renaissance Festival
Total cost: free - I made it from scraps left over from other things  (well, the bias tape and cording, so maybe $10)


Sunday, September 15, 2013

state of the dress (exclamation point)

The dress progresses!

I added slash pockets!
Here they are!   I love pocket bags!

This is where I started figuring out the ISO and shows the real color of the fabric!
Also the basting holding the layers together!

I also switched the linings for facings!
Not my usual choice, but so far the dress is all machine washable,
and I didn't want to screw that up or buy more fabric!
!!!!!!!!!!!!!!!!!!!!!!!!!!!!!!!!!!!!!!!!!!!!!!!!!!!!!!!!!!!!!!!!!!!!!!!!!!!!!!!!!!!!!!!!!!!!!!!!!!!!!!!!!!!!!!!!!!!!!!!!!!!!!!!!!!

Sunday, September 8, 2013

Fitting B5748

I really need to start paying more attention to finished garment size, rather than the sizing on the back of the envelope, as Butterick and I have rather different ideas about reasonable amounts of ease.


a straight size 14 - no alterations.

Anyhow, to lop this sucker down to a more sensible size, I pinched out an inch on either side, shortened the strap in the back (and smoothed out the neckline after), and cut the back of the armseye a bit deeper (this last isn't shown in any of the pictures above - last minute alterations...)  However, other than that, it was a really good fit.   I didn't have to move the darts or make any other major alterations.

Scribbled on parts were removed.    The fold on the piece 2 got rid of the droop over my shoulders.


 now with alterations! and a skirt! and two crinolines!

(I'm pinching down the seam allowances on the sides - otherwise its hard to see the changes...  fun with lousy lighting late at night.)  Anyhow - the result is looking pretty close to the design on the package - I think their scoop neck is a bit lower than mine, but I can easily fix that during construction.


I think I'd need three crinolines to pull off the level of pouf the pattern models have going on. Not sure I really want to travel with that much fluff... so we shall see. 
Related Posts Plugin for WordPress, Blogger...